|
What is tricky about installing the Clutch lever
is that you have to use some of the parts from the OEM (Original Equipment Manufacturer)
lever. Those parts are the actual actuator components. Getting the actuator
off the OEM lever and re-installed into the new CRG lever is the issue.
The actuator is the part(s) that actually move the clutch piston. They are what
moves in and out. There is a rubber boot that the actuator slides into and you can
see it move when you pull the clutch lever in and out. If you remove your OEM lever
you will see how this is put together. The actuator is the black skinny cone shaped
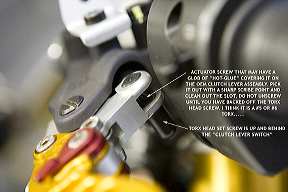
piece that pivots about. If you look directly at the opposite end of the cone
tip you will see a bit of what appears to be "HOT GLUE". That needs to
be removed. Use a small sharp object such as a metal scribe to remove all the glue.
What you will then see is there is the head of a screw. Now place the lever facing
so that you are looking at the underside of the lever. On that black piece that pivots
and into which the cone shape piece is fitted you will notice a VERY small Torx head
screw. I think it is a size 5 or 6 Torx.
This screw MUST be backed out first. Once this screw is loose you can then unscrew
the cone shaped piece using the screw head you exposed when you removed the glue.
I noted the position of the cone shaped piece in relationship to the moveable piece
and when I put these two pieces in the new CGR lever I made sure they were exactly
in the same relationship as they were before I did anything. What is important is
that when you install the new CRG lever is that there is some slop, meaning there
should be a tiny bit of free play between the cone shaped piece and where it contacts
the clutch piston. I did NOT re-glue the head of the slotted screw. I am thinking
the tiny Torx head screw is enough.
If you feel the least bit uncomfortable please have your shop preform this install.
The break side is a very easy and there are none of the issues that the clutch side
has.
PHIL KRUG Founder PAKBIKES
ADDITIONAL COMMENTS FROM OTHER FOLKS
figuring this out required going to my dealer yesterday. i couldn't find the
right tiny tool, because the set screw is also covered in glue or something.
the size is 1.5 mm allen, but it takes something smaller to dig the glue out before
you can use the 1.5. my dealer (the owner of Moto Mechanicca, Santa Rosa, CA)
used a 1 mm allen to dig, then a propane torch to help clean it out some more, than
a hammer to delicately place the 1.5, then it unlocked. we switched the parts
then he used silicon to fill the tiny 1.5 allen up again. this part is trickier
than than the rest of the part switch. my dealer said the first time he did
this he blew it and ruined both his allen wrench and the set screw.
This is different then my setup. The screw that was "hot glued" in place,
the screw that actually adjusts the position of the piece that contacts the master cylinder
on my setup was is a slot head! I used a scribe to "pick out" the glue.
I will incorporate your findings on my web page related to the CRG swap. Talk about
consistency! I know Ducati has several different schemes for adjusting
and locking in the clutch side lever on their different bikes but I would have thought
that they would have at least been consistent in a given model. IMHO Ducati NEVER
meant to have someone take this apart or make adjustments. Very possibly Ducati
has different suppliers for the same parts and each of those suppliers does things
a bit differently. Nothing in the Shop Manual for the PS shows or discusses the clutch
side lever other then to identify it as a complete assembly.
|